


Before you even start sanding the floor, safety first!
All these sanders will produce dust and you will be using noisy machines – so hearing protection is a must. Debris is a possibility, so wearing gloves is also a good plan. Eye protection is recommended and a suitable face mask is essential unless you like clogging your cavities with old toxic varnish and peppery wood dust which can also be pretty toxic depending on the type of hardwood.
Once you’re wearing all that, you’ll either get too hot or nature will call – so you’ll probably end up doing work without protection and suffering from sinusitis for weeks. It’s not big and it’s not smart to ignore security warnings, folks – and now you can’t say I didn’t warn you, so be it!
Floor sanding machines, what are the options?
Impact sanders work in a circular motion, the same machine that is often used to polish and clean industrial and commercial floor. If you’ve used it in any other application, you can give it a try, but sanding floor sanding may not be the best place to learn. They have very sensitive balance and will fly across the floor, spin wildly and wrap the cable around your legs if you don’t already have the magic touch. And if you even have to ask “do I?” – not you.
The pad essentially acts as a shock absorber, giving the grinder a smooth ride and ensuring even material removal. After a while (several hours or so) the pad compresses and wears out and needs to be replaced.
Installing the paper and pads is pretty easy. The paper will stick to the pad, then you just drop it on the floor (yes, that’s right, paper side down) and then sit the sander on the pad, which will only stay in place due to friction and the weight of the machine.
Old sanding pads can be cut up and reused to make excellent floor scrubbers.
Square vibrating sanders are the easiest to use and the hardest to screw with. You can rent one from most major home-building stores, and just like bumpers, you’ll need to buy pads and paper. This is the best option if you haven’t sanded floors yet, but I’m hoping it’s just a powder room floor – seriously, it has to be small for this option to work.
The procedure is the same for using a leveling or square sander. You start with a rough paper, which will smooth out any creases between the boards and give you a uniform surface. From there, each different paper grit is designed to remove the creases from the paper before, so don’t worry if the first pass leaves all the spiral lines everywhere, they will gradually disappear.
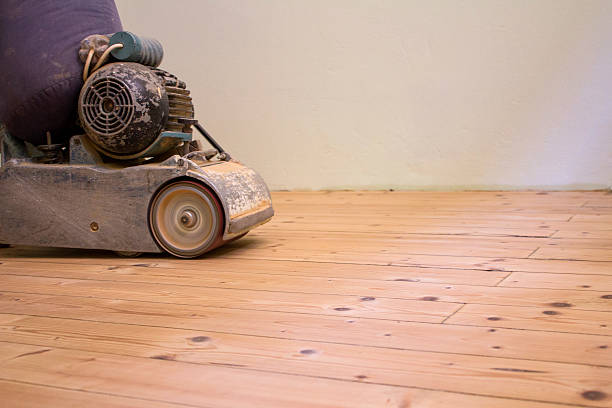
Drum sanders have a rotating belt and in experienced hands will do a quick and relatively clean job. But they can be quite tricky to learn and have much more potential to cause damage if you get it wrong. Like huge wakes, everywhere. Nightmare! If you choose this machine, make sure you start in a place that won’t be too visible. Like the dark side of the moon.
There are two types of drum sanders; point grinders and lever grinders, both of which work with sandpaper belts. Of the two, you are most likely to encounter the tip grinder, as it is relatively easier to learn and use. They have two wheels on which you can tilt the machine back to change direction while the water grinder mechanically raises and lowers the drum.
With all types of sanders (especially drum sanders), it’s important to keep the machine moving if you hope to get any kind of decent finish on your hardwood floor. If you stay in one place, you’ll start to dig a hole (literally) that will be hard to fix with more sprinkles. Very very hard if it’s laminate and you sand it!